Building a microcloud with a few Raspberry Pis and Kubernetes (Part 1)
Ever wanted to build your own (micro) cloud? Here's how we did it.
At Mirai Labs, we recently put together a Raspberry Pi cluster ("microcloud") for some research on container orchestration and Kubernetes. This is a fun exercise for anyone who wants to learn more about Raspberry Pi, Kubernetes, or cloud / distributed computing. We've gone ahead and put together a small series of tutorials from our notes to document how you can set up a microcloud for yourself!
Today, we'll do just enough to build a minimum viable product (MVP) for our microcloud. Let's dive in!
Background: What's a cloud anyways?
According to the National Institute of Standards and Technology (NIST):
Cloud computing is a model for enabling ubiquitous, convenient, on-demand network access to a shared pool of configurable computing resources (e.g., networks, servers, storage, applications, and services) that can be rapidly provisioned and released with minimal management effort or service provider interaction.
NIST goes on to identify the five key elements of cloud infrastructure:
- On-demand self-service: Can a user provision computing resources automatically without human intervention?
- Broad network access: Can a user access computing resources over standard network protocols?
- Resource pooling: Are user workloads dynamically pooled across available computing resources?
- Rapid elasticity: Can users quickly scale their workloads at any time?
- Measured service: Can resource usage be monitored, controlled, and reported?
In order to meet NIST's definition of a cloud, our system needs to check off the boxes for all five of these elements.
Challenging? Yes—if we were building everything from scratch that is. But by building on top of an open-source cloud orchestrator like Kubernetes, we can get all five of these elements with minimal effort.
Building a microcloud
OK, first things first: we need some actual "computing resources" to add to our microcloud. We could use any old laptop or PC, but since we will need several of these up at all times, a better choice would be some dedicated hardware.
In fact, an SBC would fit our bill perfectly to keep things simple. And there is no better known SBC than the good 'ol Raspberry Pi! A Raspberry Pi is a great choice for our use-case because:
- It is cheap enough to buy several nodes for our cluster
- It is energy efficient (~2-5W) so we can keep it running 24/7 if need be
- It has a small physical footprint so we can throw it anywhere we'd like
Of course, there are downsides as well:
- It has limited processing and memory resources
- It requires apps to be compiled for ARM to run
We think these trade-offs are justified, especially since this system is mostly for educational purposes.
For our container orchestrator, let's go with what is soon becoming an industry-standard: Kubernetes. This requires us to use at least two nodes, since Kubernetes requires a master node that will manage additional worker nodes.
With those design decisions in mind, here's a bird's-eye view of the system we will be building:

What you'll need

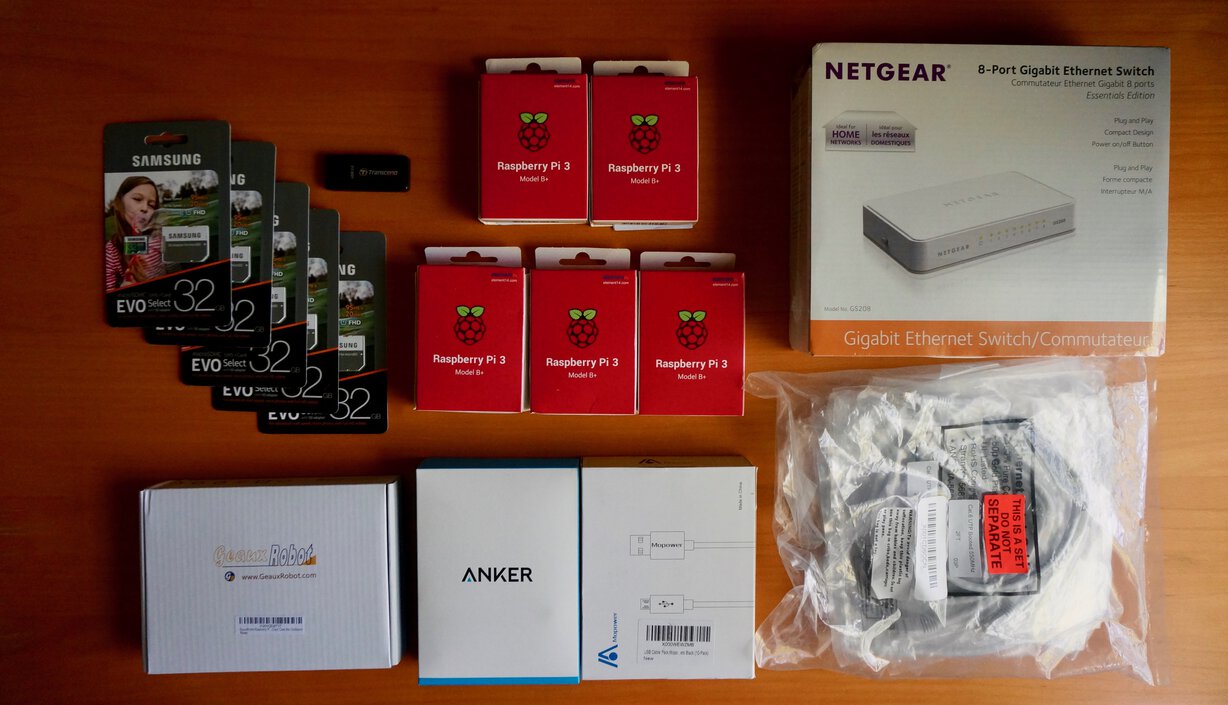
Here is a complete inventory of parts we selected (affiliate links included):
- Raspberry Pi 3 Model B+ x5 (~$215)
- Samsung 32GB MicroSDHC EVO Select Memory Card x5 (~$38)
- Anker 60W 6-Port USB Wall Charger x1 (~$30)
- Mopower 10 Pcs 1.6FT USB 2.0 A Male to Micro B x1 (~$13)
- GeauxRobot Raspberry Pi 3 Model B 5-layer Dog Bone Stack x1 (~$28)
- Transcend TS-RDF5K USB 3.0 Card Reader x1 (~$9)
Total: ~$330
Optional: If you don't want to use Wi-Fi (we found that Wi-Fi works fine for our purposes though), you'll need a switch and some Ethernet cables:
- NETGEAR 8-Port Gigabit Ethernet Switch x1 (~$19)
- InstallerParts (10 Pack) Ethernet Cable x1 (~$16)
Assembling the Pis
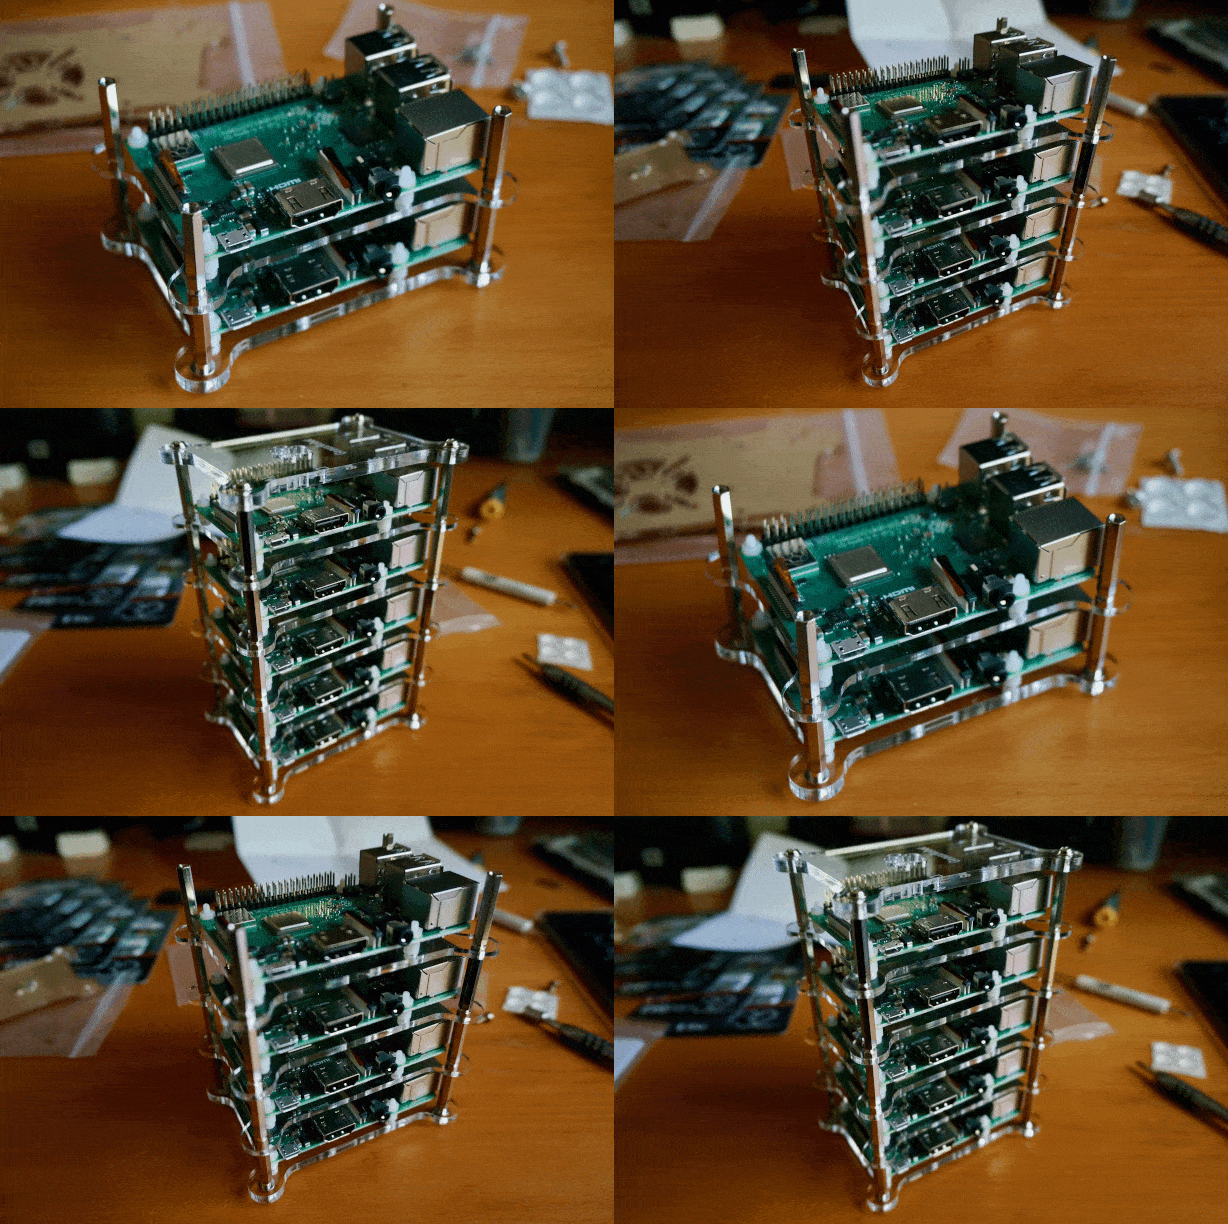
Bust out your toolbox because its time to assemble some Pis.

All in all, it took us about an hour to get our cluster assembly finished. Not too bad!
Now that the mechanical assembly is done, let's get these Pis flashed and ready to run.
Setting up the OS
Let's begin by downloading the latest Raspbian Lite image.
Or, for those who live in the terminal:
$ curl -Lo raspbian_lite_latest.zip https://downloads.raspberrypi.org/raspbian_lite_latest
Now we'll need to flash this image to our SD cards. There are a few options to get this done, and you can read the official guide for a detailed walkthrough of your options.
If you're on Linux though, we can just use dd. Assuming your sdcard's device id is /dev/sdc (please double check which device your sdcard is mounted as or you may wipe your PC's data by accident!):
$ unzip -p raspbian_lite_latest.zip | sudo dd of=/dev/sdc bs=4M conv=fsync status=progress
Enable SSH by creating a file ssh in the boot (first) partition of the SD card:
$ sudo mount /dev/sdc1 /mnt/rpi
$ sudo touch /mnt/rpi/ssh
$ sudo umount /mnt/rpi
Eject the SD card:
$ sudo eject /dev/sdc
Now plug the SD card into your RPi.
Note: Since I didn't have conveninent access to Ethernet when setting this up, I had to connect a USB Keyboard and HDMI monitor for connecting to my secured Wi-Fi network.
Boot the Pi, then log in with username 'pi' and password 'raspberry'.
Then setup the Pi with the built-in program:
$ sudo raspi-config
We recommend setting some easily recognizable hostnames for your nodes while you are setting up your Pi. Our naming scheme was rpi-kluster-x, with x from 0 to 4 for each of our five nodes (0 = master, 1-4 = workers).
Note: My keyboard was not recognized correctly so I had to go to Localisation Options > Change Keyboard Layout and set it to "Generic 101-key PC" with English (US) layout.
Installing Kubernetes (k3s)
k3s is a lightweight, yet certified, version of Kubernetes that offers a simpler installation process than standard Kubernetes. We will use k3s for our microcloud to keep things simple.
Bootstrap the master node
Let's bootstrap the k3s server on our master node:
$ curl -sfL https://get.k3s.io | sh -
We can verify k3s is up and running with:
$ systemctl status k3s
Note the k3s token, which we will need to bootstrap the workers next:
pi@rpi-kluster-0:~ $ sudo cat /var/lib/rancher/k3s/server/node-token
K92a636fade39d4f9d288459a51c1e44a889e62a5d8e2163e68e0897c3ef817445c::node:1e3434684f3febebd293302ea1d460ae
Bootstrap the worker nodes
Now let's join a worker node:
$ curl -sfL https://get.k3s.io | K3S_URL="https://rpi-kluster-0:6443" K3S_TOKEN="K92a636fade39d4f9d288459a51c1e44a889e62a5d8e2163e68e0897c3ef817445c::node:1e3434684f3febebd293302ea1d460ae" sh -
Repeat this process for all the worker nodes in your cluster.
Using our microcloud
We now have a simple Raspberry Pi cluster set up with a single master node and several worker nodes running Kubernetes (k3s). But how do we actually use our cluster?
Create an app
To use our microcloud, we need an app!
Let's create a simple hello world node.js server based on Minikube's hello world example.
In the interest of time, we have already pushed up a ready-to-use image on Docker Hub that you can use to quickly get going. We will go over, in detail, how to package your apps in a future post (there is a little trickery needed to cross-compile ARM images).
Deploy your app
Let's use kubectl, the command-line interface to the Kubernetes API, to deploy our hello-world app:
pi@rpi-kluster-0:~ $ sudo kubectl create deployment hello-world --image=mirailabs/hello-world
You will see that Kubernetes has provisioned a pod for your app and is currently creating your app container:
pi@rpi-kluster-0:~ $ sudo kubectl get pods
NAME                           READY   STATUS              RESTARTS   AGE
hello-world-564779476b-xnt2c   0/1     ContainerCreating   0          5s
And after a few minutes, you will see your app running:
pi@rpi-kluster-0:~ $ sudo kubectl get pods
NAME                           READY   STATUS    RESTARTS   AGE
hello-world-564779476b-xnt2c   1/1     Running   0          5m5s
We can even specify the -o wide flag to see which node our pod is running on:
pi@rpi-kluster-0:~ $ sudo kubectl get pods -o wide
NAME                           READY   STATUS    RESTARTS   AGE     IP          NODE            NOMINATED NODE   READINESS GATES
hello-world-564779476b-xnt2c   1/1     Running   0          7m56s   10.42.5.6   rpi-kluster-4   <none>           <none>
In this example, our pod is running on node rpi-kluster-4, which has a Kubernetes-internal IP of 10.42.5.6.
Expose your app
In order to expose our app outside the Kubernetes internal virtual network, we need to expose it via a service. For simplicity (remember, this is a MVP!), let's use a service of type NodePort that will expose our app on a reserved port on any node in our cluster:
pi@rpi-kluster-0:~ $ sudo kubectl expose deployment hello-world --type=NodePort --port=8080
Let's confirm that our hello-world service is running:
pi@rpi-kluster-0:~ $ sudo kubectl get svc
NAME          TYPE        CLUSTER-IP      EXTERNAL-IP   PORT(S)          AGE
hello-world   NodePort    10.43.125.154   <none>        8080:30454/TCP   67m
kubernetes    ClusterIP   10.43.0.1       <none>        443/TCP          29d
We can see that our deployment has been successfully exposed as a NodePort service on port 30454.
Now, we can use our app from anywhere on our network by sending a request on port 30454 to any node in our cluster:
$ curl rpi-kluster-0:30454/trying-node-0
Hello, World!
$ curl rpi-kluster-1:30454/trying-node-1
Hello, World!
$ curl rpi-kluster-2:30454/trying-node-2
Hello, World!
$ curl rpi-kluster-3:30454/trying-node-3
Hello, World!
$ curl rpi-kluster-4:30454/trying-node-4
Hello, World!
And we can see logs from our app container:
pi@rpi-kluster-0:~ $ sudo kubectl logs -f deployment/hello-world
Received request for URL: /trying-node-0
Received request for URL: /trying-node-1
Received request for URL: /trying-node-2
Received request for URL: /trying-node-3
Received request for URL: /trying-node-4
We built a microcloud!

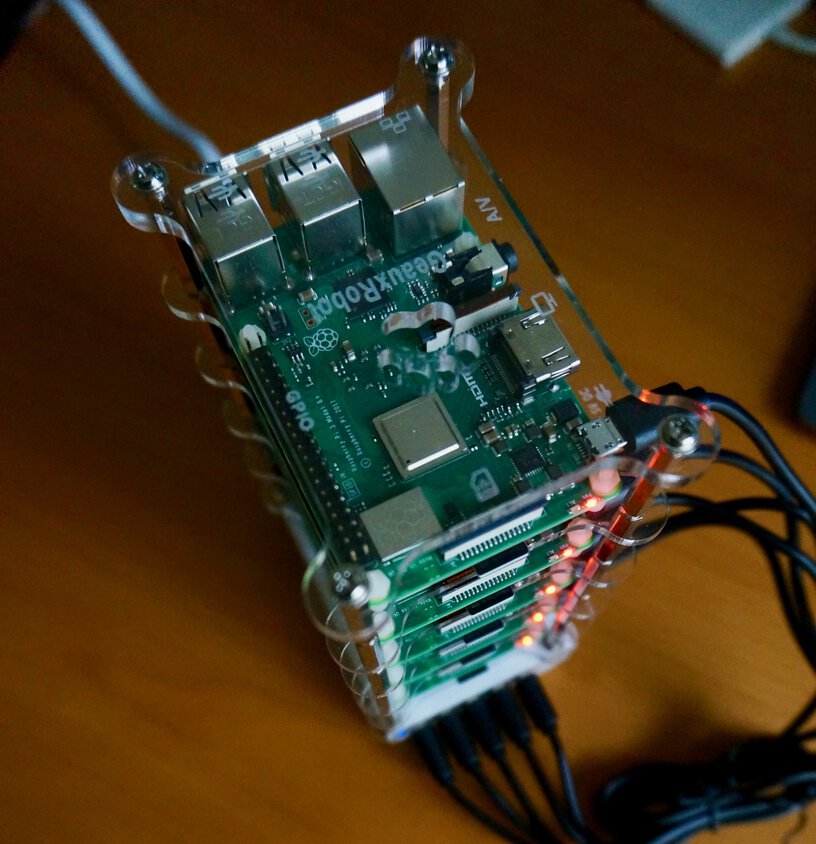
Whew, we did it! We built a simple microcloud!
Let's recap what we did quickly. We were able to put together an MVP for our own little private cloud by setting up a Kubernetes cluster on a few Raspberry Pi nodes. Using Kubernetes as our container orchestrator gives us all five key elements of cloud infrastructure, and we were able to demonstrate the first three of them in this post:
- On-demand self-service: Provisoning resources is as simple as interacting with our cluster via
kubectl. - Broad network access: We can manage our Kubernetes cluster (via
kubectl) and access our apps (via "services") from anywhere on our network via standard protocols. - Resource pooling: Kubernetes takes care of scheduling our workloads ("pods") dynamically across available worker nodes.
We have yet to touch the last two elements, rapid elasticity and resource monitoring, but we will be examining them soon in future posts (spoiler: Kubernetes can help us again).
We would also like to explore:
- How do we actually package custom apps?
- How do we scale our workloads?
- How do we secure our microcloud?
- How can we expose our microcloud on the public internet so we can use it from anywhere?
- ...and more
We plan to tackle these questions in subsequent posts, so make sure to subscribe to our newsletter below to be notified as soon as they are available!
Automating things
We have created a GitHub repository where you can find some resources that will help you set up your own microclouds. Right now it contains:
- A script to automate flashing your Raspberry Pi nodes
- Code for the hello-world example container app we used in this tutorial
We will be adding to our repository as we continue our experiments. Make sure to give it a star if its useful for you!
References
Discussion
Updates
- 2019-11-14 — Fix typo in deployment name (thanks u/cerealbh)