Configuring Android App Signing on React Native
Some tips on getting your React Native Android app signed for production.
It's time. You've toiled away on your React Native app for months and it's finally time to deploy your baby to the world.
But first, you'll need to set up Play App Signing. Although this process isn't complicated, it's a little annoying since you have to deal with key passwords without exposing them.
At Mirai Labs, we deal with native Android and React Native apps so often that managing app signing has become a very common task for our team. After some trial and error, we found a solution that works pretty well, cleanly separating the upload key information from the rest of our app. Here's a short tutorial on how you can give our setup a try in your next app!
Step 1 — Generate your upload key
First, you'll need to generate an upload key that you'll use to sign your app when you upload it to the Play store.
To generate your key using a simple GUI within Android Studio, follow the latest instructions from the Android Developer docs.
Here's a quick summary of the steps:
- Open up Android Studio
- Click Build > Generate Signed Bundle/APK
- Select Android Bundle or APK depending on the type of artifact you need (Android Bundle is usually the way to go) and click Next
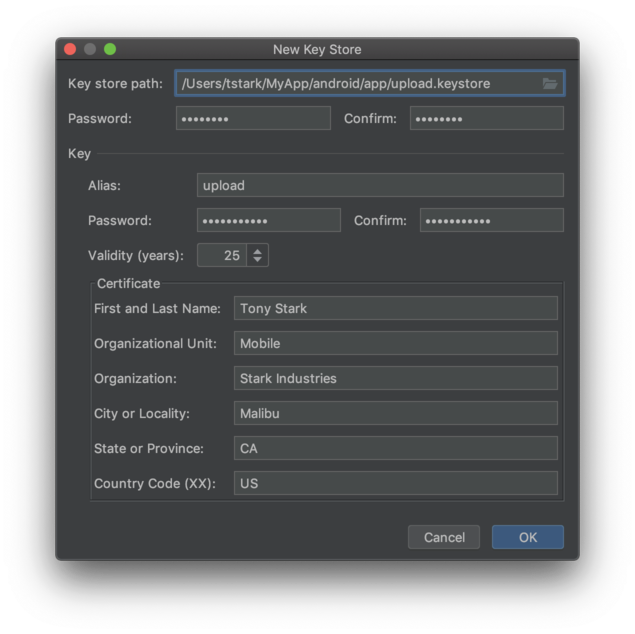
- Click Create new... under Key Store Path
- Fill out the fields as shown in the screenshot. Note to name your keystore
upload.keystoreand store it inandroid/appto be consistent with your app's debug keystore. Set the alias toupload. Remember to note down your key passwords somewhere handy — we'll need them in the next step. - Click OK
- Click Cancel (we will generate the signed APK later)
Step 2 — Configure your build to use the upload key
This is where the official docs aren't that great. The official docs ask you to add your key passwords to either the user-wide ~/.gradle/gradle.properties or your app's android/gradle.properties. If you work on multiple Android projects, mixing up your upload key passwords in a single user-wide file can be messy, and the alternative of storing them in the checked-in file android/gradle.properties is a no-no since the passwords are stored in plaintext.
Instead, what you can do is create a separate upload.keystore.properties file and keep it within your app's workspace, but add it to your .gitignore (or, if you're not using git, your VCS's equivalent) so you don't commit it to source control. This way, your secrets (although still in plaintext) are at least separated from the rest of your codebase.
First create android/app/upload.keystore.properties and add your keystore config:
key.store=upload.keystore
key.alias=upload
key.store.password=*********
key.alias.password=*********
Now update android/app/build.gradle to use the properties file you just created:
...
signingConfigs {
        debug {
            storeFile file('debug.keystore')
            storePassword 'android'
            keyAlias 'androiddebugkey'
            keyPassword 'android'
        }
        // ADD THE RELEASE BLOCK BELOW
        release {
            def keystorePropertiesFile = rootProject.file('app/upload.keystore.properties')
            if (keystorePropertiesFile.exists()) {
                def keystoreProperties = new Properties()
                keystoreProperties.load(new FileInputStream(keystorePropertiesFile))

                storeFile file(keystoreProperties['key.store'])
                storePassword keystoreProperties['key.store.password']
                keyAlias keystoreProperties['key.alias']
                keyPassword keystoreProperties['key.alias.password']
            }
        }
    }
    buildTypes {
        debug {
            signingConfig signingConfigs.debug
        }
        release {
            signingConfig signingConfigs.release // 'signingConfigs.debug' -> 'signingConfigs.release'
            minifyEnabled enableProguardInReleaseBuilds
            proguardFiles getDefaultProguardFile("proguard-android.txt"), "proguard-rules.pro"
        }
    }
...
The code reads fairly well, but what we are doing is reading in the upload key properties we have defined in app/upload.keystore.properties and telling Gradle to use them for our release builds.
We also guard against the case where the release properties file doesn't exist (perhaps someone on your team without release key access is mistakenly trying to run a release a build); you will simply see a signing failed error in this case.
Step 3 — Configure your VCS to ignore your upload key passwords
If you're using git, add a line to your .gitignore to prevent accidentally checking in your passwords stored in upload.keystore.properties:
...
# BUCK
buck-out/
\.buckd/
*.keystore
!debug.keystore
upload.keystore.properties
...
If you're not using git, check your VCS's documentation to determine how to add upload.keystore.properties to your ignore list.
Step 4 — Build a signed release
To build your release bundle run the following from the android directory:
$ ./gradlew bundleRelease
If you've set up everything correctly, your build will sign your app bundle with your new upload key, producing an app bundle at android/app/build/outputs/bundle/release/app-release.aab.
Upload your app bundle to the Google Play Console and opt in to App Signing by Google Play when prompted.
Recap
You should now have Android app signing configured for your React Native app. Your upload key passwords are still stored within your app codebase, but they are cleanly separated from the rest of your code and will not be checked into version control.
There is still one problem remaining, however: our passwords are stored in plaintext. In a future article, we will discuss how to plug this last security hole.
That's it for now! We hope you found our approach to Android app signing useful for your next React Native app!